PostgreSQL: Database Creation and Data Population
This article is part of our Academy Course titled PostgreSQL Database Tutorial.
In this course, we provide a compilation of PostgreSQL tutorials that will help you set up and run your own database management system. We cover a wide range of topics, from installation and configuration, to custom commands and datatypes. With our straightforward tutorials, you will be able to get your own projects up and running in minimum time. Check it out here!
In the first tutorial of this series (PostgreSQL: Introduction and installation tutorial) we explained how to download a sample database and import it into our PostgreSQL server. This approach, although appropriate at the time, did not show how to create a database of our own from scratch – which is an essential skill that every database administrator (DBA) or developer who intends to use PostgreSQL must has. In addition, under regular circumstances there are multiple database user accounts with different access permissions based on their respective assigned tasks. For that reason, we will also cover the topic of user creation here.
1. Creating a new database
To being, let’s switch to the postgresql Linux account and enter the psql prompt.
sudo -i -u postgres
psql
As we have explained previously, at this point we are not connected to any database.
Inside the database we were about to create, we will add two tables where we will store the actual information in an organized manner. Our database will be called BookstoreDB and the two tables will be AuthorsTBL and BooksTBL with the following fields in them (if you feel you need to brush up your memory about data types, feel free to refer to PostgreSQL commands and datatypes):
| AuthorsTBL | |
| Field name | Data type |
| AuthorID | serial, primary key |
| AuthorName | varchar(100) |
| LastPublishedDate | date |
| BooksTBL | |
| Field name | Data type |
| BookID | serial, primary key |
| BookName | varchar(100) |
| AuthorID | int, foreign key |
However, we will begin by creating a database role (also known as username) so that in the next step we will use it as owner of the database:
CREATE ROLE scg;
That said, let’s create the new database as follows:
CREATE DATABASE BookstoreDB OWNER scg;
The expected output is shown in Fig. 1:

Next, we will connect to our newly-created database and create the tables:
\c bookstoredb;

CREATE TABLE AuthorsTBL (
AuthorID    SERIAL PRIMARY KEY,
AuthorName    VARCHAR(100),
LastPublishedDate    DATE
);

CREATE TABLE BooksTBL (
BookID    SERIAL PRIMARY KEY,
BookName    VARCHAR(100),
AuthorID    SERIAL,
FOREIGN KEY (AuthorID) REFERENCES AuthorsTBL (AuthorID)
);
Now the next step consists of populating the database with actual data.
2. Populating the database
Since BooksTBL contains a foreign key that points to AuthorsID in AuthorsTBL, we will need to create a few records in that table first using the INSERT statement as follows. Note that each value must match the right field and data type:
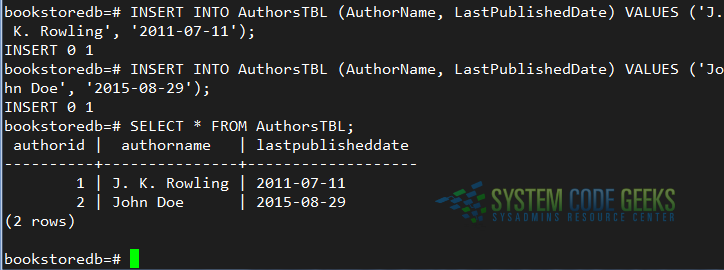
INSERT INTO AuthorsTBL (AuthorName, LastPublishedDate) VALUES ('J. K. Rowling', '2011-07-11');
INSERT INTO AuthorsTBL (AuthorName, LastPublishedDate) VALUES ('John Doe', '2015-08-29');
Afterwards, we can use the SELECT statement to query the AuthorsTBL. Note how the AuthorID field was populated automatically since its data type was set to serial and primary key (see Fig. 2):

Next, let’s insert some records into the BooksTBL table. If we try to insert a record with an AuthorID that does not exist in AuthorsTBL we will get an error as you can see in Fig. 3:
INSERT INTO BooksTBL (BookName, AuthorID) VALUES ('Harry Potter', 3);
INSERT INTO BooksTBL (BookName, AuthorID) VALUES ('Harry Potter and the philosophers stone', 1);
INSERT INTO BooksTBL (BookName, AuthorID) VALUES ('Harry Potter and the half-blood prince', 1);
INSERT INTO BooksTBL (BookName, AuthorID) VALUES ('Whatever', 2);
INSERT INTO BooksTBL (BookName, AuthorID) VALUES ('Whatever returns', 2);
As you can see, an insert with a foreign key referencing a non-existent primary key in AuthorsTBL fails.
3. More queries
The classic SELECT statement as used earlier will return all the fields in a given table (that is what the star sign * stands for). We can also restrict the number of fields by listing them after the SELECT. For example, we can do
SELECT AuthorName FROM AuthorsTBL;
to retrieve only the AuthorName. Of course, that’s going to be of little use, but it is worth mentioning.
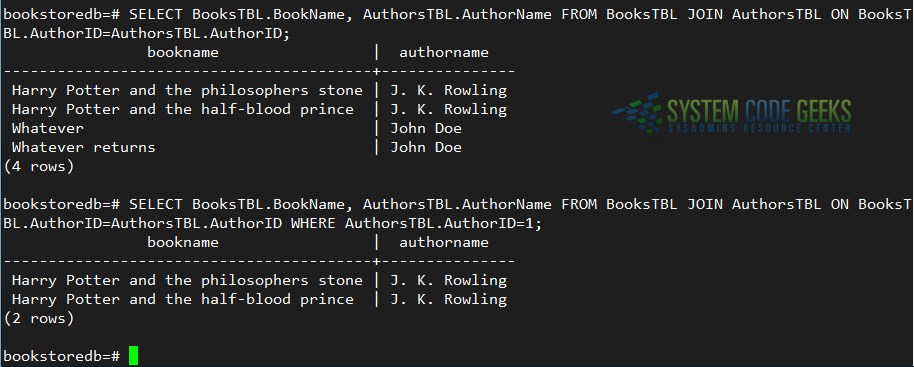
We can also choose to combine records from both tables using a JOIN. This operation allow us to return a set of records from two or more tables as if they were stored in a single one. To illustrate, we will list all book titles along with the author name and perform the JOIN on the field that both tables have in common (AuthorID):
SELECT BooksTBL.BookName, AuthorsTBL.AuthorName FROM BooksTBL JOIN AuthorsTBL ON BooksTBL.AuthorID=AuthorsTBL.AuthorID;
If we only want to return those books where J. K. Rowling is the author, we can add a WHERE clause and either use AuthorID=1 or AuthorName=’J. K. Rowling’ in the filter. Usually, integers are preferred in WHERE clauses, so we will go with
SELECT BooksTBL.BookName, AuthorsTBL.AuthorName FROM BooksTBL JOIN AuthorsTBL ON BooksTBL.AuthorID=AuthorsTBL.AuthorID WHERE AuthorsTBL.AuthorID=1;
You can view the result of the above queries in Fig. 4:

You can view other examples of querying in each of the previous articles in this series.
4. Summary
In this article we have explained how to create a database role and make it the owner of a database during creation. In addition, we showed how to create tables -taking into consideration the available datatypes- and how to populate and query them. By using JOINs and WHERE clauses you will be able to retrieve the necessary information as if it was all in the same table.
Hope it helps.


