Linux chown Example
1. Introduction
In this example, we feature a comprehensive Linux chown Example. We will see how to use the Unix-like system command chown
The chown command changes the owner and owning group of files.
1.1 Linux Machine
If you are on Windows OS, before we get into the details of this command, I would suggest you to have a Linux machine for better understanding of the usage of this command.
Not necessarily you need to physically have a separate machine. You can very much have a virtual Linux machine on a virtual box like Oracle VirtualBox.
2. Syntax
chown [OPTION]... [OWNER][:[GROUP]] FILE...
chown [OPTION]... --reference=RFILE FILE...
3. Description
chown changes the user and/or group ownership of each given file.
If only an owner is given, that user is made the owner of each given file, and the files’ group is not changed.
If the owner is followed by a colon and a group name, with no spaces between them, the group ownership of the files is changed as well.
If a colon but no group name follows the user name, that user is made the owner of the files and the group of the files is changed to that user’s login group.
If the colon and group are given, but the owner is omitted, only the group of the files is changed; in this case, chown performs the same function as chgrp. If only a colon is given, or if the entire operand is empty, neither the owner nor the group is changed.
4. Options
Here is the list of options available to use with chown command
| -c, –changes | like verbose but report only when a change is made. |
| -f, –silent, –quiet | suppress most error messages. |
| -v, –verbose | output a diagnostic for every file processed. |
| –dereference | affect the referenced file of each symbolic link rather than the symbolic link itself. This is the default. |
| -h, –no-dereference | affect symbolic links instead of any referenced file. This is useful only on systems that can change the ownership of a symlink. |
| –from=CURRENT_OWNER:CURRENT_GROUP | change the owner and/or group of each file only if its current owner and/or group match those specified here. Either may be omitted, in which case a match is not required for the omitted attribute. |
| –no-preserve-root | do not treat ‘/‘ (the root directory) in any special way. This is the default. |
| –preserve-root | Do not operate recursively on ‘/‘. |
| –reference=RFILE | use RFILE’s owner and group rather than specifying OWNER:GROUP values |
| -R, –recursive | operate on files and directories recursively. |
The following options modify how a hierarchy is traversed when the -R option is also specified. If more than one is specified, only the final one takes effect.
| -H | if a command line argument is a symbolic link to a directory, traverse it. |
| -L | traverse every symbolic link to a directory encountered |
| -P | do not traverse any symbolic links. This is the default. |
| –help | display this help and exit. |
| –version | output version information and exit. |
Owner is unchanged if unspecified. Group is unchanged if unspecified, or changed to the login group if implied by a ‘:‘ following a symbolic OWNER. OWNER and GROUP may be numeric as well as symbolic.
5. Examples
Please refer to the image shown below.
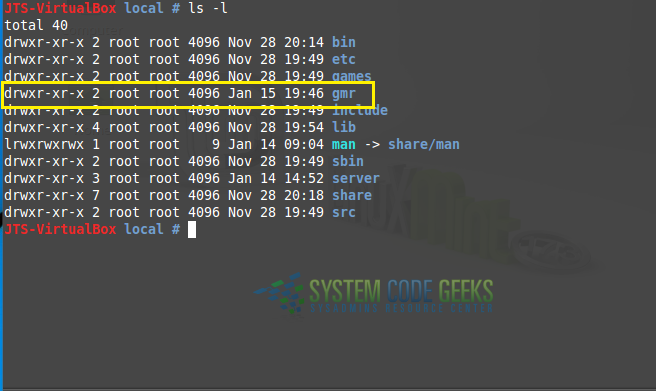
We will see the details of the information given above with yellow rectangle mark.
- 1st Character – File Type: First character specifies the type of the file.In the picture above the ‘d’ in the 1st character indicates that this is a directory.
Following are the possible file type options in the 1st character of the ls -l output.
- Field Explanation
- – normal file
- d directory
- s socket file
- l link file
- Field 1 – File Permissions:The remaining 9 characters, in order, refer to the read/write/execute(rwx) permission for the user owner, the read/write/execute(rwx) permission for the group owner, and then the read/write/execute(rwx) permission for everyone else.In this example,
rwxr-xr-xindicates read-write-execute permission for user, read-execute permission for group, and read-execute permission for others. - Field 2 – Number of links: Second field specifies the number of links for that file. In this example, 2 indicates 2 links to this file.
- Field 3 – Owner: Third field specifies owner of the file. In this example, this file is owned by username ‘root’.
- Field 4 – Group: Fourth field specifies the group of the file. In this example, this file belongs to ”root’ group.
- Field 5 – Size: Fifth field specifies the size of file. In this example, ‘4096’ indicates the file size.
- Field 6 – Last modified date & time: Sixth field specifies the date and time of the last modification of the file. In this example, ‘Jan 15 19:46′ specifies the last modification time of the file.
- Field 7 – File name: The last field is the name of the file/directory. In this example, the file name is ‘gmr’
5.1 Change User Owner
Please refer the image shown below. In this the user owner of a folder has been changed to a new user.
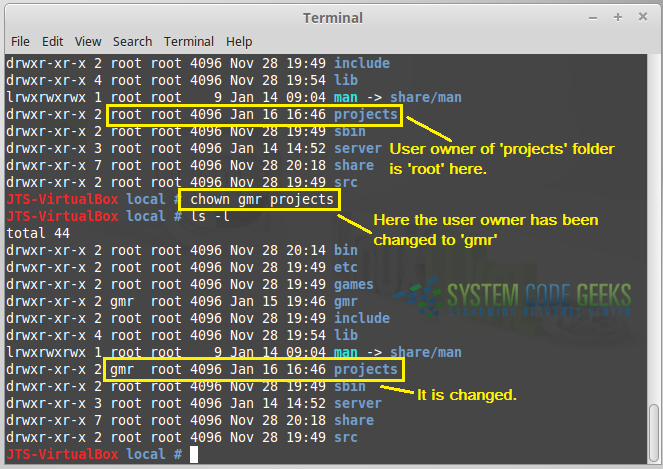
But, user owner has been changed only for the directory ‘projects’. Ownership of the inner files or directories will remain the same, unchanged.
If the flag ‘-R’ is used, it will change the owner for inner files / directories also.
Recursively grant ownership of the directory projects, and all files and sub-directories, to user gmr.
chown -R gmr projects
5.2 Copy ownership from one file to another
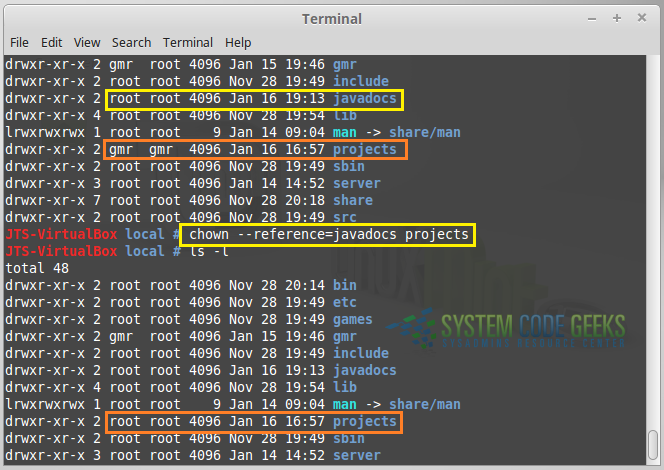
This can be done using the ‘–reference’ flag.
# chown --reference=file tmpfile
As shown below, ownership of ‘javadocs’ folder has been copied to ‘projects’ folder.
5.3 Change the group of a file
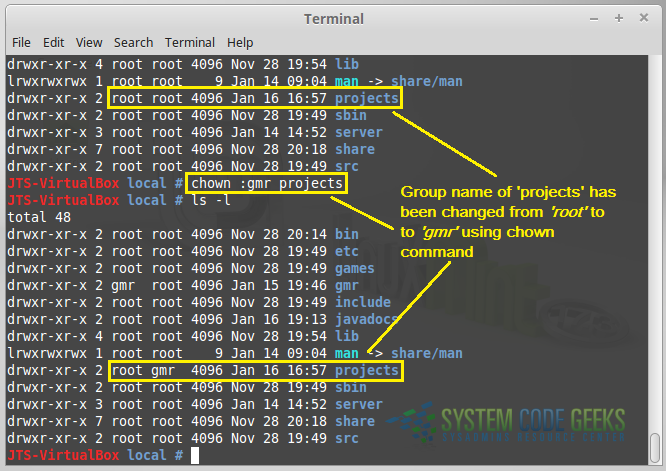
Using chown command, the group (that a file belongs to) can also be changed.
6. Conclusion
In this Linux chown Example, we have seen how to use Linux command chown with different options.


