Linux tar Examples
In this post, we feature a comprehensive Linux tar Examples. I am a real fan of learning Linux commands by examples and from my personal experience it will really help to see some Linux tar command examples. But first, a brief bit of background information. The name “tar” stands for “tape archive”.
As that name implies, originally it was a command that Unix administrators used to deal with tape drives. Where we now use the Linux tar command to create a tar file, we used to tell it to write the tar archive to a device file (e.g in /dev).
Nowadays the Linux tar command is more often used to create compressed archives that can easily be moved around, from one disk to anther disk or machine to machine, in other words we can call it as backup utility and its been used in most of the Unix flavors. One user may archive a large collection of files, and another user may extract those files, with both of them using the tar command.
1. Create a tar archive of a directory
In this example we will come to know basic tar command using option ‘cvf’ to create a tar archive.
Here we are creating a tar file ‘my-archive.tar’ for a directory ‘/home/my-directory’ in current working directory:
[root@chasiota /]# tar cvf my-archive.tar /home/my-directory
c – Creates a new .tar archive file
v – Verbosely list files which are processed
f – File name type of the archive file
2. Create a zipped archive
In order to make tar ball as zipped archive , we need to use the option “z”.
In below example the command will make “my-archive.tar.gz” for a directory “/home/my-directory” in current working directory.
[root@chasiota /]# tar cvzf my-archive.tar.gz /home/my-directory
3. List the contents of a tar archive
To list the contents of an uncompressed tar archive, just replace the cflag with the tflag, like this:
[root@chasiota /]# tar tvf my-archive.tar
This lists all the files in the archive, but does not extract them.
To list all the files in a compressed archive, add the zflag like before:
[root@chasiota /]# tar tzvf my-archive.tgz
or for a tar.gz archive:
[root@chasiota /]# tar tzvf my-archive.tar.gz
4. Extract tar archive contents
To extract the contents of a Linux tar archive, now just replace the tflag with the x(“extract”) flag. For uncompressed archives the extract command looks like this:
[root@chasiota /]# tar xvf my-archive.tar
For compressed archives the tar extract command looks like this:
[root@chasiota /]# tar xzvf my-archive.tar.gz
or this for *.tgz:
[root@chasiota /]# tar xzvf my-archive.tgz
5. Extract tar.bz2 archive contents
In order to extract the contents of a *.tar.bz2 file the options are “xj”.
[root@chasiota /]# tar xvjf my-archive.tar.bz2
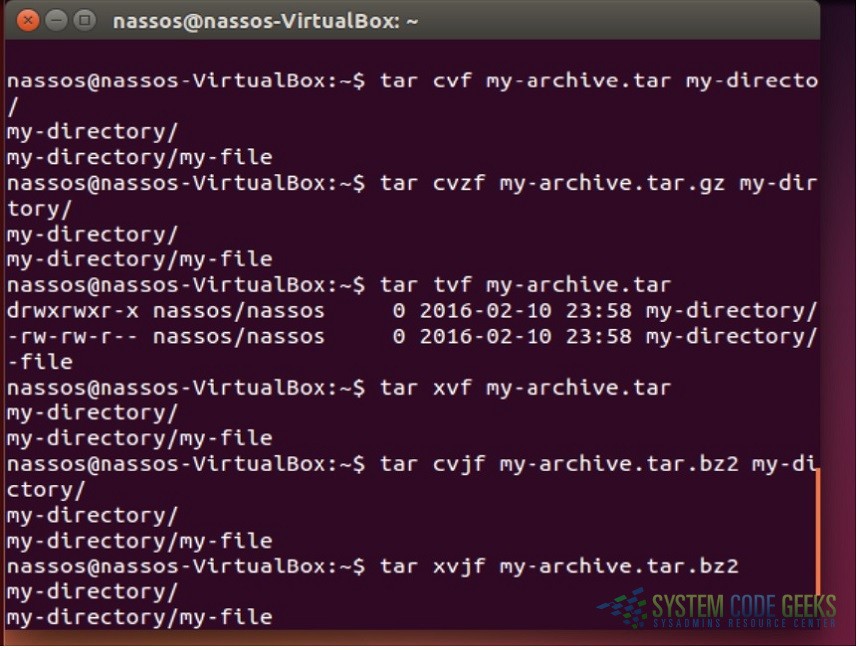
The below image illustrates the commands seen so far:

6. Extract a single file from tar archive
To extract a specific file from a tar archive, specify the file name at the end of the tar xvf command as shown below. The following command extracts only a specific file (my-file.sh) in the current directory from a large tar file.
[root@chasiota /]# tar xvf my-archive.tar my-file.sh
7. Create a compressed archive of the current directory
Many times when using the Linux tar command you will want to create an archive of all files in the current directory, including all subdirectories. You can easily create this archive like this:
[root@chasiota /]# tar czvf my-directory.tgz .
In the above example, the ‘.’ at the end of the command is how you refer to the current directory.
8. Create an archive in a different directory
You may also want to create a new tar archive like that previous example in a different directory, like this:
[root@chasiota /]# tar czvf /tmp/my-directory.tgz .
As you can see, you just add a path before the name of your tar archive to specify what directory the archive should be created in.
9. Extract a single directory from tar archive
To extract a single directory (along with its subdirectory and files) from a tar archive, specify the directory name at the end of the tar xvf command as shown below. The following extracts only a specific directory from a large tar file:
[root@chasiota /]# tar xvf my-archive.tar home/my-directory/
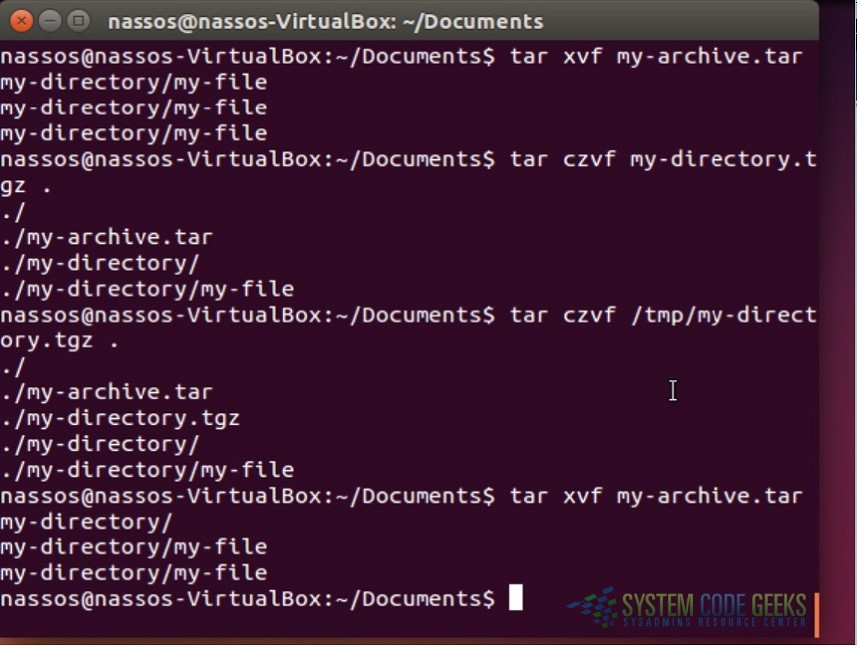
Check below image for examples 6-9:

10. Extract a single directory from tar.gz archive
We just need to add “z” to the above extract command “xvf”
[root@chasiota /]# tar xvzf my-archive.tar.gz home/my-directory/
11. Check the size of the tar, tar.gz and tar.bz2 Archive File
For any tar, tar.gz and tar.bz2 archive file, the below commands will display the size of archive file in Kilobytes (KB):
[root@chasiota /]# tar -cf - my-archive.tar | wc -l
[root@chasiota /]# tar -czf - my-archive.tar.gz | wc -l
[root@chasiota /]# tar -cjf - my-archive.tar.bz2 | wc -l
12. Verify integrity of tar file
As part of creating a tar file, you can verify the integrity of the archive file that got created using the option “W” as shown below:
[root@chasiota /]# tar tvfW my-archive.tar
If an output line starts with Verify, and there is no differs line then the file/directory is OK. If not, you should investigate the issue.
Note: for a compressed archive file ( *.tar.gz, *.tar.bz2 ) you cannot do the verification.
13. Find the difference between an archive and file system
Finding the difference between an archive and file system can be done even for a compressed archive. It also shows the same output as above excluding the lines with Verify.
Finding the difference between gzip archive file and file system:
[root@chasiota /]# tar dfz my-archive.tgz
Finding the difference between bzip2 archive file and file system:
[root@chasiota /]# tar dfj my-archive.tar.bz2
14. Delete a file from tar ball
You can use the following syntax to delete a file from a tar ball:
[root@chasiota /]# tar --delete -f my-archive.tar home/my-file
15. Add a file to an existing archive
You can add additional files to an existing tar archive with “r” option:
[root@chasiota /]# tar rvf my-archive.tar my-file
16. Add a directory to an existing archive
Adding a directory is also the same. We need to mention the directory name instead of the file name:
[root@chasiota /]# tar rvf my-archive.tar my-dir/
17. Extract group of files from tar, tar.gz, tar.bz2 archives using regular expression
You can specify a regular expressions , to extract files matching a specified pattern. For example, the following tar command extracts all the files whose file ends with .java:
[root@chasiota /]# tar xvf my-archive.tar --wildcards '*.java'
18. Untar multiple files from tar, tar.gz and tar.bz2 File
To extract or untar multiple files from the tar, tar.gz and tar.bz2 archive file. For example the below command will extract “my-file-1” “my-file-2” and “my-file-3” from the archive files:
[root@chasiota /]# tar -xvf my-archive.tar "my-file-1" "my-file-2" "my-file-3"
[root@chasiota /]# tar -zxvf my-archive.tar.gz "my-file-1" "my-file-2" "my-file-3"
[root@chasiota /]# tar -jxvf my-archive.tar.bz2 "my-file-1" "my-file-2" "my-file-3"
19. Restore files with tar
More important than performing regular backups is having them available when we need to recover important files. The following command will restore all files from the full-backup-Day-Month-Year.tar archive, which is an example backup of our home directory:
[root@chasiota /]# tar xpf /dev/st0/full-backup-Day-Month-Year.tar
The p option preserves permissions; file protection information will be remembered.
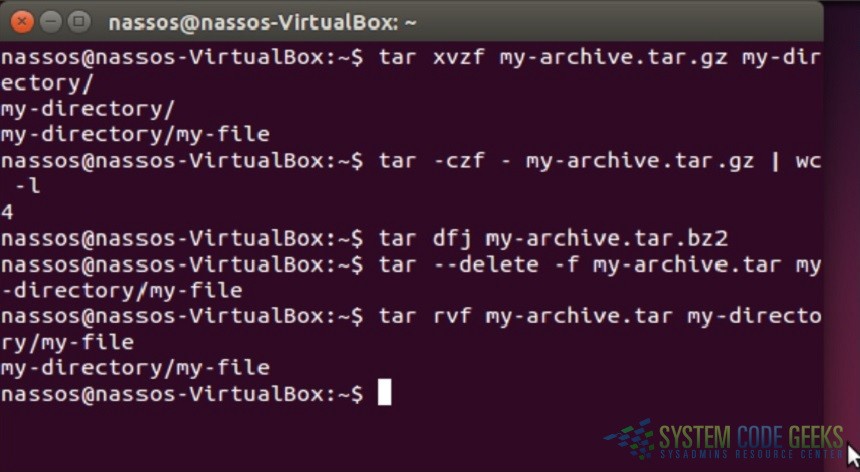
Some of the above examples are depicted in the below image:

20. Check the manual page for tar
You can always refer to the manual page for all available tar commands:
[root@chasiota /]# man tar


Use tar to move files….
tar cBf – . | ( cd /otherdir && tar xBf – )
tar cBf – . | ssh server “(cd /otherdir && tar xBf – )”
hey,nice examples of tar command.i am bookmarking it.