Managing VirtualBox Virtual Machines through Command Line (with VBoxManage)
This article is part of our Academy Course titled VirtualBox Tutorial: Virtualization Essentials.
In this course, we provide a compilation of VirtualBox tutorials that will help you get started with this virtualization platform. We cover a wide range of topics, from installing the software and performing a basic configuration, to cloning, exporting, importing, and removing virtual machines. With our straightforward tutorials, you will be able to get your own Virtual Machines up and running in minimum time. Check it out here!
Throughout this series we have learned how to create, manage, take / restore snapshots and configure virtual machines via the VirtualBox user interface. By now you should feel comfortable performing these tasks through the UI.
In this article we will explain how to use
VBoxManage, the command line alternative, to perform the same operations directly from the shell in your host machine. Among other things, this can prove useful when 1) you need to include your virtual machines in your backup routines (regardless of the operating system you are using), or if you want to perform a management operation through cron in Linux or the Task Scheduler in Windows.VBoxManage provides others that cannot be accessed (yet) from it. On the other hand, there are tasks that are considerably easier to perform using the GUI, such as creating new virtual machines, and for that reason we will not cover how to do it using the command line.Introducing VBoxManage
A distinguishing characteristic of VBoxManage is that it needs to be followed by a generic operation or an action to be taken on a virtual machine using its id. We will illustrate this through examples in the next section.
If you are using Linux, VBoxManage was added to your PATH environment variable when you installed it. You can verify by typing
which VBoxManage
If the above command returns the absolute path to the binary file (/usr/bin/VBoxManage in my case), it means the directory where VBoxManage resides (most likely /usr/bin) is in your PATH (no surprise here). I would be surprised if that is not the case.
If you are on Windows, VBoxManage should be located inside the Program Files → Oracle → VirtualBox folder. In order to be able to invoke the commands listed in this guide directly, you will need to use the command prompt (cmd) and either browse to that directory or add it to the current PATH (note that this method applies only to your current Command Prompt session):
set PATH=%PATH%;"C:\Program Files\Oracle\VirtualBox"
For the rest of this guide we will use Linux. If you are using Windows you should not see any major differences, if at all.
Listing virtual machines
To show lists, we will use VBoxManage list. Particularly, we are interested in listing
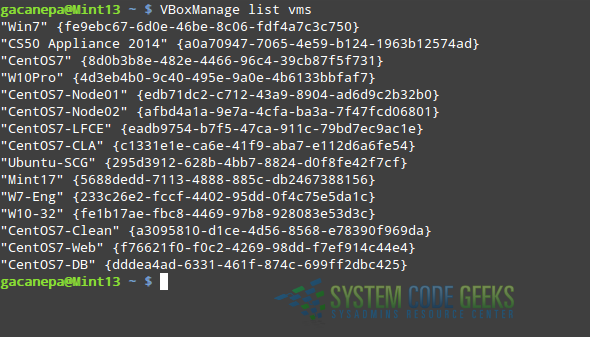
- Appliances currently registered with VirtualBox (see Fig. 1), along with their corresponding UUID:
VBoxManage list vms
- Virtual machines that are currently running:
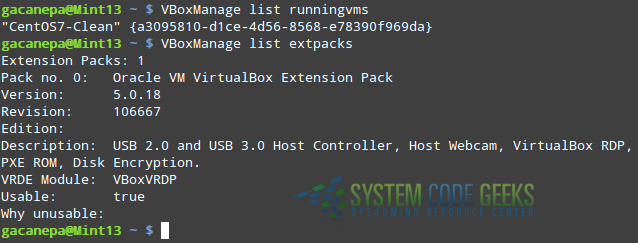
VBoxManage list runningvms - Extension packs that are installed:
VBoxManage list extpacks
Fig. 2 shows the expected result of the last two commands, provided that you have at least one virtual machine running and have installed the extension pack as discussed at the beginning of this series:
Showing and modifying information and settings of virtual machines
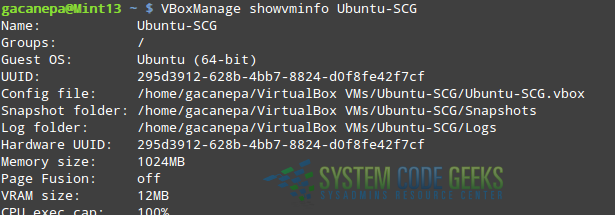
To show all the information available for a particular virtual machine, we will use VBoxManage showvminfo followed by the name of the appliance (as returned by VBoxManage list vms). You will not only be able to see settings as the name, the UUID, and the amount of RAM allocated for this appliance, but also the list (and description) of snapshots taken, the path to the snapshots directory, the location of the log and configuration files, and much more. For example,
VBoxManage showvminfo Ubuntu-SCG
will display all the information about the virtual machine named Ubuntu-SCG. Part of the expected output is shown in Fig. 3:
Perhaps you will want to group virtual machines following some sort of criteria. For example, you may want to create a group for a specific project and add some virtual machines to it for easier administration.
Using the following command we will add CentOS7-Node01 and CentOS-Node02 to a group named Cluster. If the group does not exist, it will be created when the first appliance is added to the group. The forward bar (/) before the group name is necessary. Please note that operations that are targeted at modifying settings of virtual machines use the VBoxManage modifyvm:
VBoxManage modifyvm "CentOS7-Node01" --groups "/Cluster"
VBoxManage modifyvm "CentOS7-Node02" --groups "/Cluster"
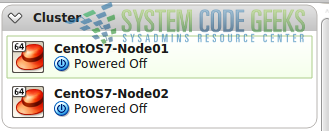
After you run the above commands, the Cluster group will appear in the user interface with the list of machines that have been assigned to it, as can be seen in Fig. 4:
To remove a virtual machine from a group, do:
VBoxManage modifyvm "CentOS7-Node01" --groups ""
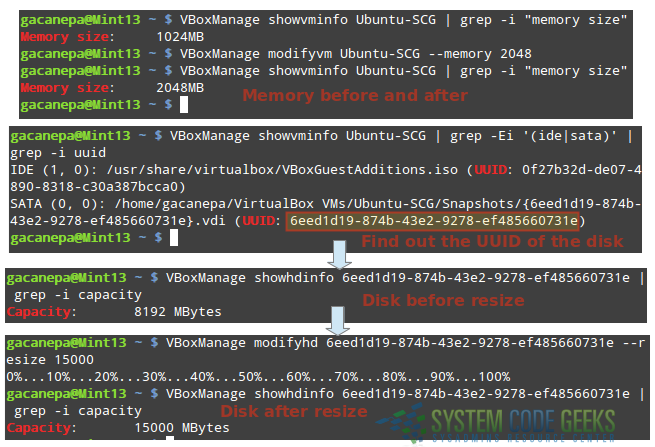
Now picture the following scenario. Perhaps you bought some more RAM for your host and can now afford to allocate 2048 MB (instead of the original 1 GB that was allocated during creation). In addition, you just realized that you need to resize the existing virtual disk of Ubuntu-SCG (currently 8 GB) to -let’s say- 15 GB. We can perform both operations from the command line in a snap (note that the virtual machine must be stopped prior to running the following commands):
VBoxManage modifyvm Ubuntu-SCG --memory 2048
To resize a disk, we must first identify it and reference it using either its specific UUID (NOT the appliance’s UUID) or its name. That means we will have to use VBoxManage showvminfo Ubuntu-SCG first to find out this information:
VBoxManage showvminfo Ubuntu-SCG | grep -Ei '(ide|sata)' | grep -i uuid
VBoxManage showhdinfo 6eed1d19-874b-43e2-9278-ef485660731e | grep -i capacity
Fig. 5 shows the values before and after the changes:
Similarly, to change the name or the device the first network interface is attached to (bridged to eth0 in this case), you can do
VBoxManage modifyvm Ubuntu-SCG --name "Ubuntu-SCG-New"
and (use the new name here if you ran the above command previously):
VBoxManage modifyvm "Ubuntu-SCG-New" --nic1 bridged --bridgeadapter1 eth0
Let’s now see how we can export virtual machines using the command line.
Exporting and importing appliances
In the case you do your backups using some sort of shell script, VBoxManage export (followed by the virtual machine name, can help you get the job done. The following command will export the CentOS7 appliance to ~/VMexports/CentOS7.ova:
VBoxManage export CentOS7 --output ~/VMexports/CentOS7.ova
To import it (not surprisingly), we will use VBoxManage import:
VBoxManage import ~/VMexports/CentOS7.ova
You can use the -n (--dry-run) option with VBoxManage to simulate the import process. The machine will not be imported, just a simulation will be performed.
Starting and stopping virtual machines
Suppose you need to start a virtual machine at a give time. To accomplish this, you can create a shell script that runs -through cron- the following command:
VBoxManage startvm CentOS7 --type headless
The --type headless option ensures no GUI is brought up.
To force stop the machine, simply do:
VBoxManage controlvm CentOS7 poweroff
Note that you should resort to the above alternative in case where you cannot access the appliance by any other method (SSH, RDP, etc). Otherwise, you run the risk of damaging it.
Summary
In this article we have explained how to use VBoxManage, VirtualBox’s command line alternative for managing appliances. Since this topic would deserve a series of its own, we only covered the most frequently used options. You can refer to Chapter 8 of the VirtualBox documentation guide for a complete list of options and available command line operations.


