Nginx Configuration Guide (Ubuntu 12.04 LTS)
In this post, we feature a comprehensive Nginx Configuration Guide. This article is part of our Academy Course titled Introduction to Nginx.
This course will introduce you to the magic of nginx. You will learn to install and configure nginx for a variety of software platforms and how to integrate it with Apache. Additionally, you will get involved with more advanced concepts like Load Balancing, SSL configuration and Websockets proxying. Check it out here!
Table Of Contents
1. Configuration file syntax
According to Merriam-Websters online dictionary, the word syntax represents “the way in which words are put together to form phrases, clauses, or sentences”. Of course that definition, as it is taken from a dictionary, is aimed at English (or actually any other language) students. So what about IT people coming from all backgrounds, languages, and countries? The change in context does not alter the meaning of the term very significantly. In particular, the syntax of a configuration file must be correct, as seen by the program that will parse it, in order for it to work efficiently.
We will learn to understand and how to write (and / or modify) a configuration file for Nginx under Ubuntu 12.04 LTS. That will be accomplished by specifying a set of values that will define the behavior of the web server.
2. Configuration directives
By default, the behavior of Nginx is defined by its main configuration file, which is located (as seen before and unless we have modified this setting) at /usr/local/nginx/conf/nginx.conf. This file is composed of a list of directives organized in a logical structure that is very easy to follow and understand (see Fig. 1).
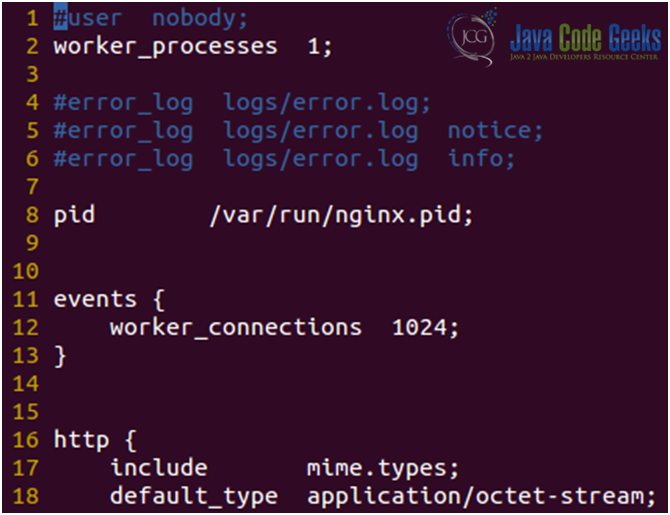
The lines that begin with “#” are comments, or in other words, strings of text that are not interpreted by the program during execution. You can comment out entire lines or add brief comments after a line to clarify what it is supposed to do.
The next line shows a directive, in this case worker_processes, which represents a setting to which we will append one or more values, depending on its syntax. Actually, the worker_processes directive only accepts one argument, which needs to be a numerical value. Another example of a directive is user (which is commented out in the previous line). The user directive lets us add up to 2 text strings – the first one is required and indicates the user account Nginx will run as, and the second one is optional (user group). We will need to remember, right from the start, that each directive has its own meaning and defines a particular feature of the application.
Each module that is part of Nginx has a specific set of directives. When a new module is activated, its specific set of directives becomes available, and directive blocks may also be enabled.
Directive blocks are precisely that: a block of text that lets us specify a logical construction of the configuration and allows us to use inheritance, which means that configuration found in a certain block is passed on to its children blocks as well. However, inside a children block you can still change the value of a directive that was defined in its parent block.
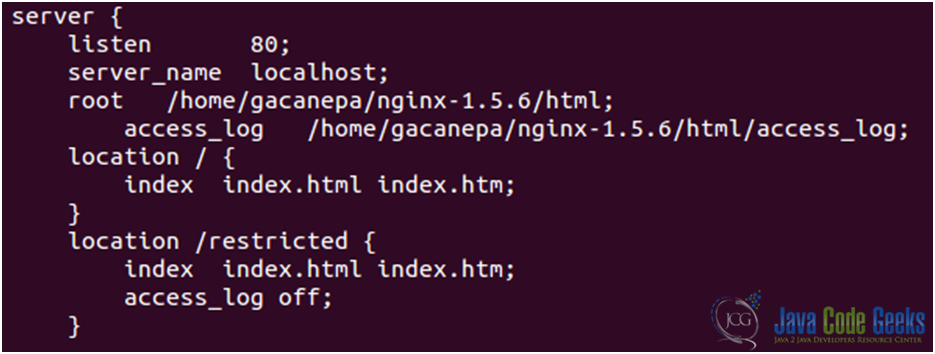
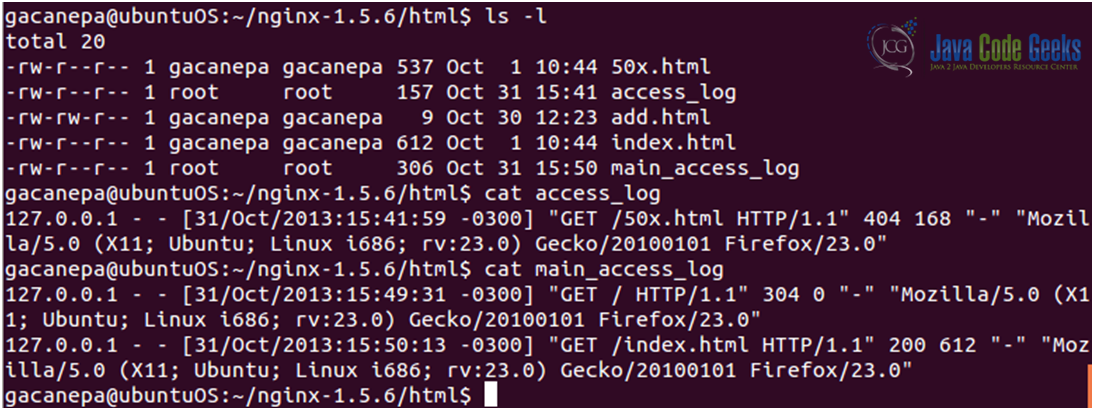
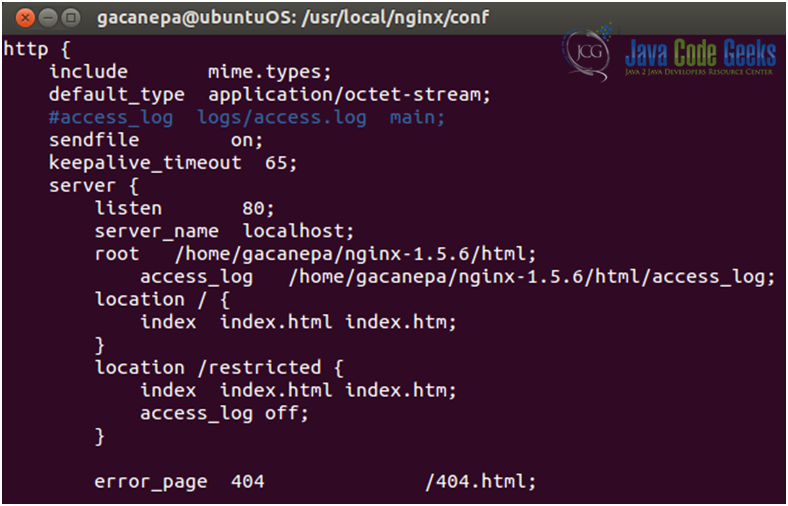
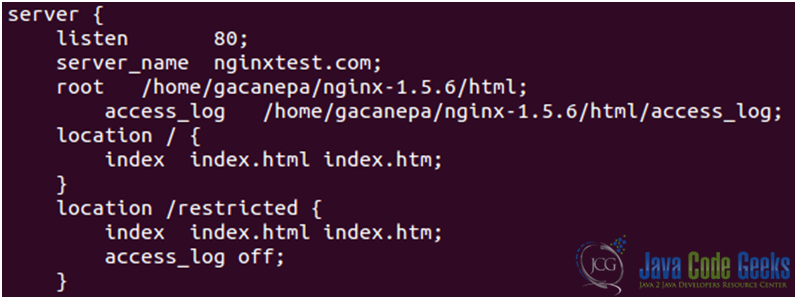
In Fig. 2a and 2b we see that all access to the root directory of the site (/) is saved to /home/gacanepa/nginx-1.5.6/html/access_log except for the access to the directory named restricted (notice the directive access_log off) in the corresponding directive block.
3. Organization and inclusions
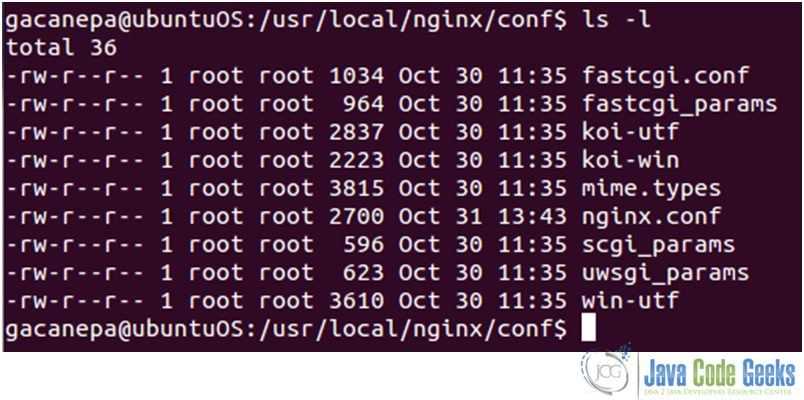
Let’s focus on line 17. There is a special directive there: include. This directive is used to insert the contents of the specified file at this exact location. The name of the file can be specified either by an absolute path or a relative path to the current directory (as it is in this case). We can see that there’s a file named mime.types in the same directory as nginx.conf (see Fig. 3).
The end result is the same that would be accomplished by actually inserting the contents of mime.types into the nginx.conf file. Of course, if we do that, the main configuration file would soon become a nightmare to read. This way the include directive helps us to ensure that the nginx.conf file remains easy to read and understand. As a plus, it works recursively in that an included file can reference another file and so on, and it also supports filename globbing, which means it recognizes and expands the standard wild card characters (* and ?) and character lists in square brackets, for example. This way we can add multiple configuration files such as 20131030.conf, 20131031.conf, and 20131101.conf. If we only want to include the files that begin with 201310, we must add the following line to the nginx.conf file (see Fig. 4):
However, if we add a specific file (not by filename globbing) that doesn’t exist, Nginx will not start properly (see Fig. 5a). Otherwise, we will be presented with a “test is successful” message (see Fig. 5b):


4. Base modules
The base modules allow us to define the basic parameters and configuration of Nginx. They are built-in into Nginx automatically during compile time. Their directives and blocks are always available. There are three types of base modules:
- The core module contains essential directives and features. Most of its directives must be placed at the root (meaning the top) of the configuration file and are only used once. Table 1 shows some directives in the core module with a brief explanation and context (if no context is specified, the actual context is global and the directive must be placed at the root of the configuration file).
| Directive/Context | Syntax and description |
daemon | Accepted values: on / off Syntax: daemon on; Enables or disables daemon mode (starts the program in the background or the foreground, respectively). Useful to troubleshoot issues. |
env | Syntax: env MY_VARIABLE=my_value;Allows us to define or define environment variables. |
error_log | Context: main, http, server, and location Syntax: error_log /path/to/file level (where level can be one of the following values: debug, info, notice, warn, error, and crit, depending on the type of errors that we want to save in the log file). To disable error logging, redirect the log output to /dev/null:error_log /dev/null crit; |
master_process | Accepted values: on / offDefault value: onIf enabled (on) Nginx will start both the master process and worker processes. If disabled, Nginx will work with a unique process. This is used for debugging purposes only and will cause that clients won’t be able to connect to the server. |
pid | Syntax: file pathDefault value: defined at compile time. Path of the file where the PID of Nginx will be stored. |
user | Syntax: user username groupname;user username;Lets you define the user account, and optionally the user group used for starting the worker processes. For security reasons, a user / group with limited privileges must be used for this. |
worker_processes | Syntax: numeric or auto, for example:worker_processes 4;Defines the amount of worker processes. If a process is blocked for some reason, future requests can be served by other worker processes. If the value auto is used, Nginx selects an appropriate value (which by default it is the amount of CPU cores detected). |
worker_priority | Syntax: Numericworker_priority 0;Defines the priority, as the operating system sees it, of the worker processes from -20 (highest) to 19 (lowest). |
Table 1: Some Core Module directives
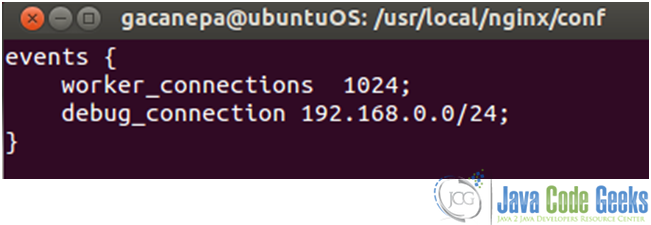
- The events module allows us to configure the operation of the networking capabilities of Nginx. These directives must be placed inside the events block at the root of the configuration file (see Fig. 6). Table 2 shows two of the directives available in this module.
| Directive/Context | Syntax and description |
worker_connections | Syntax: NumericDefines the amount of connections that a worker process may handle simultaneously. |
debug_connection | Syntax: IP address or CIDR block.debug_connection 192.168.0.100debug_connection 192.168.0.0/24Writes detailed log for clients matching this IP address or CIDR block. The information is saved in the file defined in the error_log directive (it must be enabled with the debug level, and Nginx must be compiled with the --debug switch in order to enable this directive). |
Table 2: Some Events Module directives
- The configuration module enables file inclusions with the include directive, as discussed earlier. The directive may be placed anywhere in the configuration file and accepts one (and only one) parameter: the file’s path relative to the current working directory (unless it is specified with the path all the way down from the / directory).
5. The HTTP Server
The web server itself is configured using the directives found in the HTTP Core module. This module is the essential component of the HTTP configuration and will allow us –among other things- to serve multiple websites, which are referred to as virtual hosts. It is organized into three major blocks (see Fig. 7):
- http: must be placed at the root of the configuration file. It is used to define directives and blocks related to the web server functionality of Nginx.
- server: must be inserted inside the http block and is used to declare a specific website.
- location: allows us to define a group of settings to be applied to certain sections of the web site. This block can either be used within a server block or nested inside another location block.
6. Mail server proxy
To act as mail server (not enabled by default), Nginx must be compiled with the --with-mail (which enables mail server proxy module with support for POP3, IMAP4, and SMTP) option in ./configure. If for some reason this will be the only use of Nginx in our system, the HTTP Core module can be disabled using the --without-http switch.
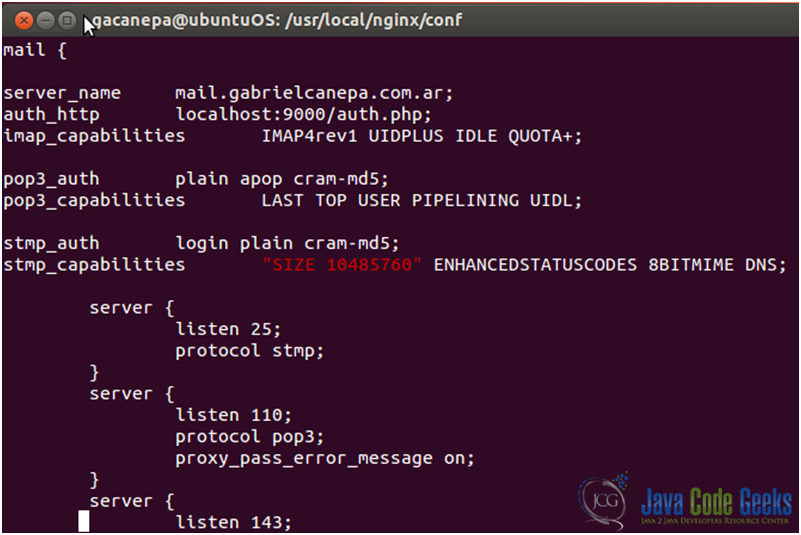
In Fig. 8 we can see a portion of the mail block, which is used to set the configuration of the mail server. The capabilities of the imap, pop3, and smtp protocols and a detailed description can be found in the IANA (Internet Assigned Numbers Authority) web site.
7. Virtual hosts
As mentioned earlier, a virtual host is a certain website that is served by Nginx in a single server.
The first step to set up virtual hosts is to create one or more server blocks in the main configuration file. Those server blocks are identified either by a hostname or through a combination or IP address and port number (see Fig. 9).
Next, we need to set up the virtual host main configuration file. The default installation of Nginx provides a sample file (located in /etc/nginx/sites-available/default) that we will copy and name after our website:
sudo cp /etc/nginx/sites-available/default /etc/nginx/sites-available/nginxtest.com
Then the next thing to do is edit the sample file (nginxtest.com) with basically the same information that is found in the nginx.conf file (see Fig. 10).

The virtual host must now be enabled by creating a symlink to this file in the sites-enabled directory:
sudo ln -s /etc/nginx/sites-available/example.com /etc/nginx/sites-enabled/nginxtest.com
To avoid conflicts, we can also delete the file named default in the sites-enabled directory:
sudo rm /etc/nginx/sites-enabled/default
Now let’s restart Nginx and look what happens! (Fig. 11)
To add more virtual hosts, we can just repeat the process above step by step, with the caution to set up a new document root with the appropriate domain name, and then creating and activating the new virtual host file as we did with the nginxtest.com website.


